
Learn how to create your very own personalized collage mug with these simple steps!

It is important to note that the process of creating a collage photo gift is very similar across all Snapfish products! (Including collage prints!)
1. Add your favorite photos to your project. Remember, you can select as many photos as you would like for your collage photo mug.
2. Photo coffee mugs have a range of ready made collage picture mug layouts available, however this does not limit you. The Snapfish builders are built to allow you to be as creative as possible!


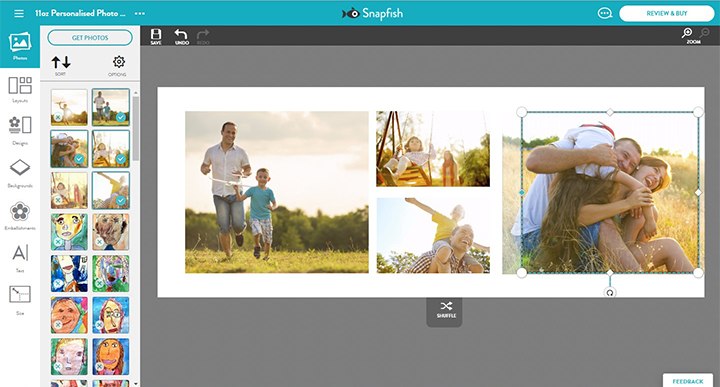
3. In order to start creating your collage picture mug, drag and drop an image onto the original template, and then press the shuffle button.
4. Shuffling your photo layout should give you an area of ‘white space’ on the template where you can drag and drop the rest of your chosen photos (at this stage the placement of the images doesn’t really matter).

5. Once you’ve added all of your photos to the design, use the shuffle button again to create your own custom collage picture layout. Each time you press the shuffle button a completely new layout will be produced. (Please note, shuffle will not move non-photo objects such as embellishments).


6. Keep shuffling your photos until you find the perfect collage layout for your pics. If you want to go back to a previous layout, simply press the undo button.
7. If you find a collage layout you like, but want to make a few tweaks you can edit your layout. There are many ways you can edit your layout. You can:
- Add additional photos by dragging and dropping photos from your photo well.
- Edit the size, orientation or location of photos in the layout using the tool bar.
- Delete photos. When you delete a photo from a layout note that its frame remains on the mug. You can also remove the frame by using the “delete” button on your keyboard again.
8. When moving your photos you may notice the bright pink lines that appear. These lines will help you to align your photos, text and embellishments.

9. Once you are happy with your layout, you can further customize your collage mug by using backgrounds, embellishments and text. Backgrounds include colors, textures, patterns and collections.

Background featured in this mug design can be found in the folder: Patterns > Organic Triangles
10. Adding embellishments to your collage picture mug helps to personalize your design. There are now over 3,000 embellishments for you to choose from, add as many as you’d like to your collage mug. In this example, we have decided to use a fun ‘Hello Sunshine‘ embellishment, to go with the bright summery theme.

11. If you want to take a closer look at your design when trying to place embellishments, click the zoom in button, then once you’re finished zoom out to see the whole design.

12. If you choose to add text to your design, you have the choice to change the font type, font size, font color and overlay a mix of fonts to make your message stand out.

In this example we have chosen to add ‘Family Fun’ in the font ‘Glastonbury’ in size 26.

13. Once you’ve completed your collage design, click ‘Review & Buy’ and this is what your collage mug will look like once printed!

All featured embellishments can be found in the Themes > Magical Moments

All featured embellishments can be found in the Themes > Watercolor Memories

All featured embellishments can be found in the Kids > Princess

All featured embellishments can be found in the Basic folder > Frames & Corners.
With these tips, we’re sure you’ll be creating fun, engaging photo collage mugs like a pro. Be sure to share your collage picture creations with us with us on social media! You can tag us with @snapfishus in your photos on Instagram or Facebook or use the hashtag #snapfish. Follow us on YouTube, Twitter and Pinterest, too. Check out the Snapfish site for even more new collage photo products.